Showing posts with label christmas. Show all posts

Tuesday, December 30, 2014

Christmas Tree Card for Miss Kate Cuttables

Good morning! I am back today to share my very last project for Miss Kate Cuttables. I am so sad that my time with this design team is over, but I am excited to see all the new projects that the new design team will be creating for us. So, for my final project, here's a little sneak peek:

Christmas Tree Card for Miss Kate Cuttables -- www.MightyCrafty.me

I love how this card turned out! I hope you will head over to the Miss Kate Cuttables blog to see my very last project for them. Thank you!

Until next time -- stay crafty,
Lissa :)

Tuesday, December 16, 2014

Christmas Card for Miss Kate Cuttables

Hello everyone! I hope you are having a fabulous December! I have been busy getting ready for Christmas (as I'm sure all of you have!), so I created this Christmas card for my project up today at the Miss Kate Cuttables blog. Here's a sneak peek:

Comfort & Joy card for Miss Kate Cuttables -- www.MightyCrafty.me

And now, you'll have to head over to the Miss Kate Cuttables blog to see my card. Let me know what you think!

Until next time -- stay crafty,
Lissa :)

Monday, December 01, 2014

Sketch N Scrap Challenge #70

Good morning! I'm excited today to be sharing a new layout based on the Sketch N Scrap sketch challenge #70. This is the first sketch challenge for the month of December -- and I was excited to get to scrap Christmas photos!

Here's the sketch:

Sketch N Scrap Challenge #70

And here is the layout I created based on the sketch:

Merry & Bright layout for Sketch N Scrap challenge #70 -- www.MightyCrafty.me

I used the Merry & Bright collection by Carta Bella. I've had this collection in my stash for awhile, and it's just adorable with lovely Christmas colors. I used foam dots behind the stickers and the title to give them some dimension from the page, and then added in the mistletoe paper die cuts from my stash.

Merry & Bright layout for Sketch N Scrap challenge #70 -- www.MightyCrafty.me

Merry & Bright layout for Sketch N Scrap challenge #70 -- www.MightyCrafty.me

Merry & Bright layout for Sketch N Scrap challenge #70 -- www.MightyCrafty.me

Merry & Bright layout for Sketch N Scrap challenge #70 -- www.MightyCrafty.me

Just super cute!

So that's my layout for this sketch! And now, head on over to Sketch N Scrap to see what the other talented designers created with this sketch...

Be sure to play along with the sketch challenge this month (and every month!) at Sketch N Scrap. Don't forget -- if you link up your creation at Sketch N Scrap, you'll be entered to win a great prize giveaway -- a new prize each month.

Until next time,
Stay crafty!
Lissa :)


Friday, February 21, 2014

How To: Cookie Cutter Background

Hello all! I'm here today to share a quick tutorial for making your own unique background papers. This is part of the Frugal Finds feature this month for Practical Scrappers. I love this monthly challenge -- to use something you probably have around the house to create something beautiful for your scrapbooks or home.

This month, our theme was cookie cutters. There are so many things you can do with cookie cutters -- I decided to use a star cookie cutter to create this beautiful and unique background paper:

Cookie cutter glittered background -- Christmas Eve -- www.MightyCrafty.me

Creating this background is super easy, even if it is a bit messy. :) Glitter does tend to get everywhere, but it's a small price to pay, right?
  1. To get started, choose your cookie cutter, background paper, glitter, and an acrylic paint that will match your glitter. That's right -- instead of using glue or tape to hold the glitter, we're going to use acrylic paint.
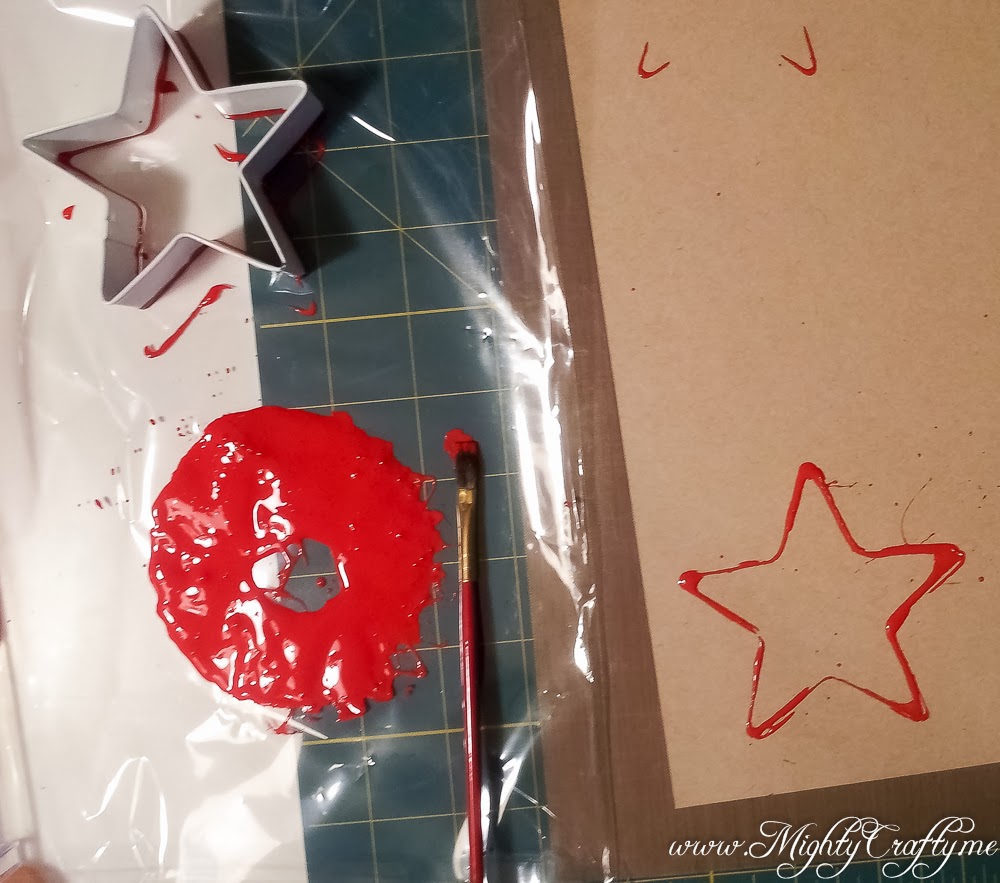
  2. Make a small pool of your acrylic paint, then dip your cookie cutter into the paint, covering all the sides. A small paintbrush can help get the paint onto your cookie cutter.

    Paint and cookie cutters -- www.MightyCrafty.me

  3. Stamp your image. This can take some finagling and practice, depending on your cookie cutter. And it won't be perfect -- but that's part of the charm.
  4. Sprinkle the paint-stamped image with glitter, then shake off the excess.

    Glitter and cookie cutters -- www.MightyCrafty.me

  5. Admire your work. :)

    Glitter and cookie cutters -- www.MightyCrafty.me
Super easy! Now, just repeat the design across your background paper. I love how it turned out -- just the right amount of glitter with a shabby chic look.

Cookie cutter glittered background paper -- www.MightyCrafty.me

With this paper as my background, I put the rest of my layout together, using papers from Webster's Pages and bits and pieces from my stash. I also cut out the Christmas title with my Silhouette Cameo, using a word from this cut file set from Miss Kate Cuttables.

Cookie cutter glittered background -- Christmas Eve -- www.MightyCrafty.me

Cookie cutter glittered background -- Christmas Eve -- www.MightyCrafty.me

I encourage you to try this technique -- it's fun and easy, and I love that it uses items you probably have at home. If you create something with cookie cutters, be sure to link it up over at Practical Scrappers. We would love to see your projects.

Until next time,

Stay crafty!
Lissa :)


Monday, December 23, 2013

More Layouts from My Monthly Kit

I'm using up the last of my December kit, and I have a few more projects to share. I really feel like I've stretched this kit into a lots of great layouts.

I created this layout as a cover page to the 2006 section of our Christmas album. I have a section for each year, and I like to create a cover page for each using our Christmas card photo.

2006 Christmas Cover Page -- www.MightyCrafty.me

It was very simple to make -- in fact, I didn't even trace any Kiwi Lane templates in the making of these strips. I just used pieces that I had already cut out and hadn't used yet. Super easy.

2006 Christmas Cover Page -- www.MightyCrafty.me

2006 Christmas Cover Page -- www.MightyCrafty.me

I also made this cover page layout for the 2008 section of our Christmas album. With all the strips of coordinating papers I already had out, this layout was equally easy and quick to create.

2008 Christmas Cover Page -- www.MightyCrafty.me

I misted the 2008 -- a die cut from my Silhouette -- to match the layout instead of leaving it white like I did on the previous layout.

2008 Christmas Cover Page -- www.MightyCrafty.me

2008 Christmas Cover Page -- www.MightyCrafty.me

 After this layout, I was really getting to the end of the kit -- I only had a few full 12x12 sheets of paper left. So I decided to kill off the kit by making a few cards. I used the border strip leftovers I had already cut with my Kiwi Lane templates to make these quick, beautiful cards.

Quick and Easy Christmas Card Set -- www.MightyCrafty.me

 I absolutely love how they turned out. Just the right ratio of fancy to simple for me.

Quick and Easy Christmas Card Set -- www.MightyCrafty.me

And with that, I think I've finished off this kit, just in time to end the month...

Saturday, December 21, 2013

Christmas Layout With My December Kit

Remember the kit I created for myself for December? I've got another layout to share that I made from the kit. I'm loving having this kit on hand. I'm using up my stash and creating lots of projects for our family holiday albums.

I created this layout based on the Kiwi Lane DT Doodle sketch for week 41. One of my favorite sketches...

Christmas Layout with My December Kit -- www.MightyCrafty.me

I used the Large Brackets from Kiwi Lane on this layout, plus a fun Fiskars border punch. Those Large Brackets are a great way to make a big impact on your page without doing a ton of layering. Love that.

Christmas Layout with My December Kit -- www.MightyCrafty.me

Christmas Layout with My December Kit -- www.MightyCrafty.me

Christmas Layout with My December Kit -- www.MightyCrafty.me

I made the felt embellishments out of layers of die cut flowers held together with a brad. A soft, easy embellishment.

Christmas Layout with My December Kit -- www.MightyCrafty.me

Another layout done with the Christmas kit I made for myself...

Have you been making any Christmas layouts this month? I would love to see them...

Thursday, December 19, 2013

Sketch 'N Scrap December Layout

Sketch 'N Scrap has posted their layout sketch for December 1 -- it's a great one (as always!).

Sketch 'N Scrap Dec. 1, 2013 sketch


I used my December kit to create this layout based on the sketch -- but I turned the sketch on its side, since I had horizontal photos I wanted to use.

Sketch 'N Scrap December Layout --- www.MightyCrafty.me

I also went a bit more monochromatic with this layout, which gives it a different look from the other layouts I've created with this kit. Love that!

Sketch 'N Scrap December Layout --- www.MightyCrafty.me

Sketch 'N Scrap December Layout --- www.MightyCrafty.me

This was a fun sketch to use -- I'll be using it again, I'm sure. Be sure to head on over to Sketch 'N Scrap for more sketch inspiration. They post two layout sketches and two card sketches each month. You'll find lots of ideas to inspire you!

Sunday, December 15, 2013

Sketch 'N Scrap Online Crop

Two posts from me in one day -- yes, I just wanted to post a quick layout I created for the Sketch 'N Scrap first-ever online crop. They are doing a bingo challenge that is really fun. So I used the "B" row to create this layout...

2011 Christmas album cover page -- www.MightyCrafty.me

This layout has all the elements from the "B" row of the bingo card:
  • Single photo
  • Season (Christmas)
  • Bling (sequins)
  • Stamps (stamped harlequin border strip)
  • Punches (punched circle border strip from Fiskars, scallop circle punch, and 2" circle punch)

I used the Heidi Swapp Believe collection paper and my Kiwi Lane designer templates to create the background layers. I die cut the 2011 with my Silhouette Cameo. The felt Christmas tree is from Making Memories.

2011 Christmas album cover page -- www.MightyCrafty.me

2011 Christmas album cover page -- www.MightyCrafty.me

I'm happy to have this layout completed for our Christmas album. It will be a cover page for the 2011 section. So happy to have had this fun challenge from Sketch 'N Scrap to get it done.

Head on over to Sketch 'N Scrap for more sketches and scrapbooking inspiration. You have until Dec. 21 to link up your layout...

Easy Updated Christmas Wreath

My Easy Updated Christmas Wreath -- www.MightyCrafty.me

As I put up my Christmas decorations this year, I was struck a bit by my door wreath. I've always loved the color and the elements, but this year, it looked a little sad and bare to me. Not very Christmas-y.

My old wreath before updating -- www.MightyCrafty.me

So I decided to spruce it up a bit when I was at Michael's this week and they had all their Christmas products on sale for 70% off. Score. I bought seven of these wreath picks for $1.50 each (originally $4.99 each):

Christmas picks on sale at Michael's -- www.MightyCrafty.me

Then I went to work, weaving them into my old wreath. I had planned to hot glue them in place, but it turned out that I got the picks to stay by just securing them behind the existing vines and stems. It took some finagling, but I finally got my wreath together.

My Easy Updated Christmas Wreath -- www.MightyCrafty.me

Gorgeous, if I do say so myself (and I do). Let's compare...


So much better...

My Easy Updated Christmas Wreath -- www.MightyCrafty.me

My Easy Updated Christmas Wreath -- www.MightyCrafty.me

My Easy Updated Christmas Wreath -- www.MightyCrafty.me

My front door is a whole lot happier. All told, I spent $10.48 to update my old wreath. A good buy for sure.

My Easy Updated Christmas Wreath -- www.MightyCrafty.me

I'm so happy I didn't just buy a new wreath. I love my updated version.

Have you rejuvenated any of your dated Christmas decor items? I would love to see. Please share it here...

Wednesday, December 11, 2013

December Fotobella Sketch Layout

I loved the monthly sketch posted at Fotobella's blog this month. As soon as I saw it, I knew it would be perfect to get a bunch of Christmas photos all together onto a single page.

Fotobella December 2013 sketch

I used my December kit and Kiwi Lane templates to create this layout based on the sketch.

Fotobella December 2013 sketch layout -- www.MightyCrafty.me

I love that I was able to get so many photos on a single page layout. What a great sketch!

Fotobella December 2013 sketch layout -- www.MightyCrafty.me

Fotobella December 2013 sketch layout -- www.MightyCrafty.me

Fotobella December 2013 sketch layout -- www.MightyCrafty.me

I love how it turned out -- and I loved using the December kit I made for myself. It's so great to be using up my stash. All of these fun bit and pieces are coming together to create some of my most favorite projects.

Have you created any Christmas projects this month? I would love to see. Please share it here...

Monday, December 09, 2013

Kiwi Lane DT Doodles Week 46

Monday is here, and it's time for another fantastic Kiwi Lane DT Doodles sketch.

Kiwi Lane DT Doodles sketch -- week 46

I love that it's a one-page sketch this week. I mostly do two-page layouts, but sometimes I only have a few good photos to showcase, so a one-pager is perfect.

Here's what I did with the sketch...

Sketch layout for Kiwi Lane DT Doodles week 46 -- www.MightyCrafty.me

This is the first layout I've created with my December kit. I'm loving these colors for Christmas -- very vintage-y. The Kiwi Lane templates I used:
  • Christmas 1
  • Holiday 1T and 7T
  • Paisley Place 1B and 3B
  • Cascade Trails 1A, 1B, and 3A
Sketch layout for Kiwi Lane DT Doodles week 46 -- www.MightyCrafty.me

Sketch layout for Kiwi Lane DT Doodles week 46 -- www.MightyCrafty.me


Sketch layout for Kiwi Lane DT Doodles week 46 -- www.MightyCrafty.me

Don't forget -- you could win a $25 shopping spree at Kiwi Lane Designs if you create a layout based on the sketch and post it at their blog. Good luck!
Related Posts Plugin for WordPress, Blogger...