Wednesday, May 30, 2012

Lightroom 3 Print Templates

I love photo collages. I've become a little bit obsessed lately with creating and printing photo collages out at home to use on my paper scrapbooking layouts. I've been inspired by the very talented Nichol Magouirk and her collage layouts. You have to check out this one and this one and this one - and do a search for a few more on her site because they are incredible. Kerri Bradford creates the most awesome photo collage templates for Photoshop that Nichol uses a lot for her layouts.

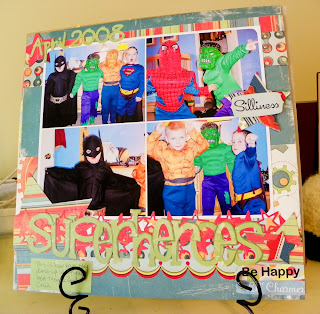
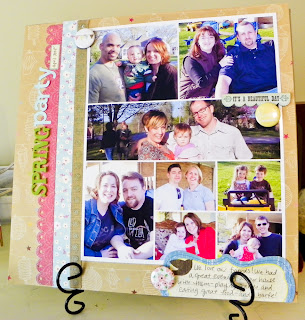
My own take on photo collage layouts - not nearly as fancy as Nichol's but I love them anyway:


I created these photo collages in Photoshop, but I knew it could be done a little quicker in Lightroom - so I started playing around with these and am hooked! Lightroom photo collages are easier because you just create a collection of your edited/cropped photos, then drag-and-drop them into the collage template. Once you get started, it's easy to make a collage to suit your needs.

I learned most of what I know from DigiScrap 101. Kayla Lamoreaux has awesome tutorials on her site about using Lightroom in general - and about using Lightroom to scrapbook and creating print templates too. I recommend starting there to see Kayla's awesome video tutorials - she also teaches an amazing class at JessicaSprague.com for Finding Your Photo Flow which has a ton of Lightroom information too. (And a special thanks to Leslie for pointing me in the right direction...)

So, back to the Lightroom print templates. I found these great Lightroom print templates from HalinaV and they got me started customizing my own templates. So, I've created a photo collage template for you as a free download. I'm just starting out with these, so if you have feedback about if / how it works for you, please let me know. This print template has been tested in Lightroom 3 and Lightroom 4.

Lightroom Print Template - www.MightyCrafty.me


To work with the template:
  1. In Lightroom, go to the Print module.
  2. Under Template Browser, right-click on User Templates and choose Import.
  3. Browse to where you saved the template, choose the template, and click Import.
I like to organize EVERYTHING, so I created a folder for my templates under the Template Browser. To do this, before you import a new template, right click on User Templates and choose New Folder. Name your folder whatever you would like, then click Create. Now follow the steps above, choosing your new folder instead of User Templates - and your new templates will end up in your new folder. Easy-peasy.


Some tips when working with print templates:
  1. Edit and - most importantly - crop your photos before you put them in the photo collage. There's not a ton of flexibility to adjust the size of your final photo once you put it in the collage without messing up the whole collage.
  2. Don't worry about the black line around the photos you see in Lightroom. When you print or export the collage, it's not there.
  3. Photo Borders: 
    1. You can adjust the width of the borders to suit your needs - just go to Image Settings in the right-side panel and look under Image Settings. Under Photo Border, adjust the slider or type in a size by clicking in the pt box. The color of the border will be the same as your Page Background color.
    2. If you want to change the color of the border to make it different from your Page Background, uncheck the Photo Border and instead check the Inner Stroke box. You can then click in the color bar and choose a different color. You can even layer these with a Photo Border for a double-matted look.
    3. If you prefer, you can turn the borders off altogether. Just uncheck the Photo Border and Inner Stroke boxes.
  4. You might want to change the collage to go landscape instead of portrait, or vice versa. To do so, click Page Setup at the bottom of the left-side panel. Under Orientation, choose Portrait or Landscape, then click OK.
When you're ready to print your collage, you can print directly to your printer or print to file.
  1. On the right-side panel under Print Job, choose Print to. You can choose Printer or JPEG File. Each gives you different options.
  2. If you choose Print to: Printer, you can set your Print Resolution, Print Sharpening, and Media Type. For my settings:
    1. Print Resolution: 300 ppi
    2. Print Sharpening: Standard
    3. Media Type: Glossy or Matte depending on the paper I'm using.
    4. Then click Print and set up your print settings for your printer as you would if you were printing a photo.
  3. If you choose Print to: JPEG file, you can still set your Print Resolution and Print Sharpening. 
    1. You can also set your JPEG Quality and Custom File Dimensions. 
    2. The Custom File Dimensions allows you to set a larger canvas size, which is great if you're a digi-scrapper and creating a digital layout to work with in Photoshop.
    3. To print, choose Print to File and choose a location to save your exported JPG. You can then print the photo collage or work with it in Photoshop to add text, paper, or embellishments.
I think that does it for today's lesson about Lightroom print templates. :) I'd love to see what you do with the template - and if this works, I'll be posting more as I create them...

Monday, May 21, 2012

Laptop Crashes and Sketch Challenges

I've been away from the blog for a bit, but I've been super busy with lots
of small home projects and crafts - more to come on those very soon, I promise.

First, I have to say I've (barely) lived through 2 laptop crashes this month and finally had to rebuild my entire machine, causing me to have to re-download my entire online backup. Thank goodness I had an online backup. I used Backblaze, and it's working great. I can't imagine what I would do if I lost my 20K photos (not to mention movies and documents and music) forever.

On the other hand, let me tell you how long it takes to download your entire 20K photo library - it takes FOREVER. I have more than 200GB in my backup - and I know that's not even a huge amount compared to others. But to download that 200GB is a time-consuming and painstaking process because you have to truly verify that each file made it intact. Sometimes you download an entire 4GB zip file and find that just 2 files in the whole thing didn't make it. Other times, all of them did. And then the next time, none of them.

It's certainly faster to download than it is to upload, but it still takes a long time. I think I'll be completely done by this weekend. If that's the case, it will have taken a week and a half to get everything back in place. That's compared to the more than a month that it took to upload everything to my online backup in the first place. But again, I'm just so so thankful I had that backup.

So - on to more positive things.

I've been getting Scrapbook Circle's monthly scrapbooking kits for a few months now, and I still love them. They always have the best combinations of colors and patterns - and I love that I don't have to match anything together. The kits always have the newest stuff too, which I love.

May 2012's kit The Story is a great one - full of subtle and bright colors. It was a fun one to play with. I used the sketch for this month to create this layout.


A simple but fun layout - everything is from the kit except the large cream letters, the mists, and the little date punch strip (both from my stash).

And then, just for fun, I thought I'd share this layout I made with last month's Scrapbook Circle kit. It was a super bright and happy kit, great for these photos of a day spent at the amusement park.


I printed out the photo collages on 8x10 photo paper, and I love them! I think I'm addicted to these collages now as I've made a bunch (before my laptop died). They are a great way to get a bunch of photos on the page.


I'll be back (hopefully) soon with my latest home projects - as soon as my laptop is back in shape.
Related Posts Plugin for WordPress, Blogger...