Showing posts with label foyer. Show all posts

Tuesday, June 04, 2013

Entry Makeover

In our new house, we've had to adjust a bit to where we store coats and shoes. We mostly come in through the garage, but since that door is right in the kitchen, there's no space to hang our stuff. So instead, we go through the dining room to the front door, where there's a little alcove and room for shoes and coats. And it's normally a mess...


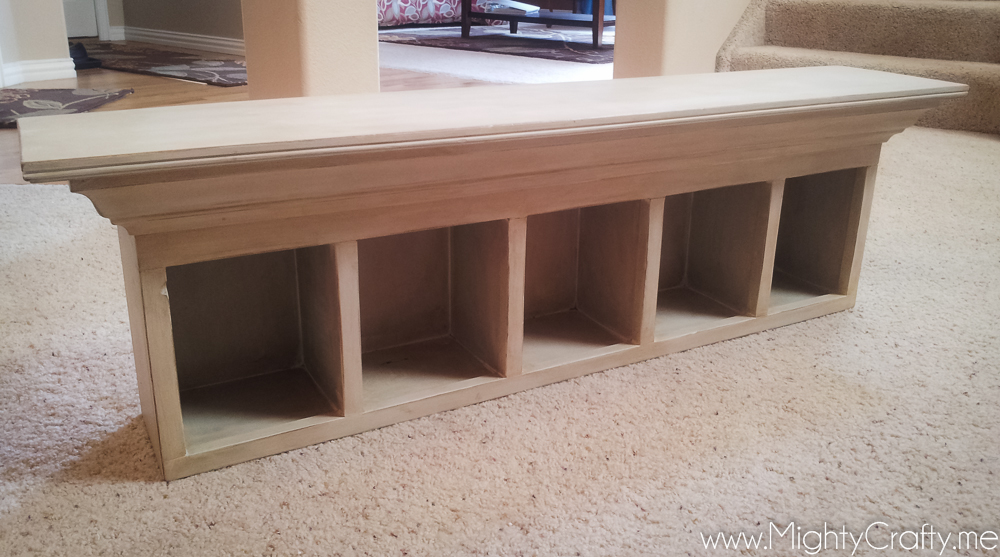
Enter this humble shelf I picked up a garage sale...


I painted it in Duck Egg blue chalk paint and hung it with two sets of hooks from IKEA. Perfect.


I love how it turned out. The entry still gets messy but it's much prettier to look at.

Monday, January 09, 2012

Gallery Wall

I made my very own gallery wall. I actually finished this up last fall but haven't had a chance to blog about it with all the holiday projects. I've seen so many beautiful gallery walls with words or quotes inserted in them all over Pinterest, and I decided to do something similar.

I had a bunch of framed black and white photos of my boys from newborn age up to age 5. (Now that they're 8, I definitely need some new ones.) They're all framed in black frames with white mats - I like the consistency of using pretty much only black frames throughout my house, so that the frames all match, no matter what shape or molding they have. And I had a blank wall in my foyer that needed decorating. So gallery wall, it was.


Before I started hanging, I needed to clean and reframe some of the photos. These had been hanging in our house in Kansas City for several years and were in need of some TLC. I was kind of amazed at how dusty the inside of a picture can get when it's been hanging on a wall for 7 years. I used this opportunity to open each frame up and clean it. I also penciled a name and a date on the back of the photo and on the front of the white mat. (Only Dad and I can tell them apart some days...)


My handy tool set included:
  • Swiffer duster - to dust :)
  • Windex wipes - to wet clean the glass (love these!)
  • Norwex polishing cloth - to dry and shine the glass
  • Painter's tape, glue, and clips - to glue and hold the frames together in a couple of spots that needed some love
  • 3M Command hanging strips - I am obsessed with these strips. I used these strips to hang all the photos on my gallery wall, even the big 20x16s. The hanging strips aren't as cheap as just nailing into the wall, but they are super easy to use and leave your walls intact. I have these in multiple sizes and keep them around continually. (The 3M Command wall hooks are a must as well - they go up quick, hold well, and come off really cleanly.) 
Then it was time to hang everything on the wall. I should have planned this out - but that is not my style at all. LOL. Instead, I just put up the first photo, and then the eyeballed where I wanted the next one to go, etc. In the first iteration (yes, there were several - see "I'm not a planner, above"), I had three straight lines of photos across the wall. And it was awful. They were straight and level, but it looked all wrong.

I took everything down and started over. Sigh. Another try. Still not what I wanted. I was driving my husband crazy at this point, with all the picture frames laying all over the floor of the living room for a week while I tried to figure out where I wanted to place them.

Finally, I had the bright idea of leaving an open space in the middle for some word art. That made all the difference in the world, and I was able to stagger the photos around the wall. So much better.


For the word art, I used phrase Live & Laugh (live__laugh_C00896_23067) from the Silhouette store. Under that, I added shape Flourish 1019 (not sure where this was from, I'm not finding it in the Silhouette store). Both were cut from black vinyl. I just love, love, love how it turned out. It makes me smile everyday.


The whole wall turned out really great for our space. Now, I just need to add some more recent photos of our boys...


Linking up to:

   Tuesday To Do Party      

Fox Hollow Cottage

Monday, January 02, 2012

Christmas Home Tour

I know Christmas 2011 is officially over, but I thought I would finally get my Christmas decor photos posted. (Resolution for next year - post this earlier!) Let's start in the foyer...


I posted about this wreath already, but this is what you see first when you step through our front door. A bright and cheery spot.


Next is our living room. This was our first Christmas in our new house, and we put our tree up in the living room. The boys love to decorate the tree. We had a lot of fun putting up our ornaments and remembering the special memories attached to each one.


The coffee table with Christmas decorations - the photo album is one of my most favorite things. It has our Christmas card photos for every year since the boys were born.


I set up several of my Christmas house on top of the hutch. I used boxes under the snow to elevate them and then put up lights behind them. Very pretty!


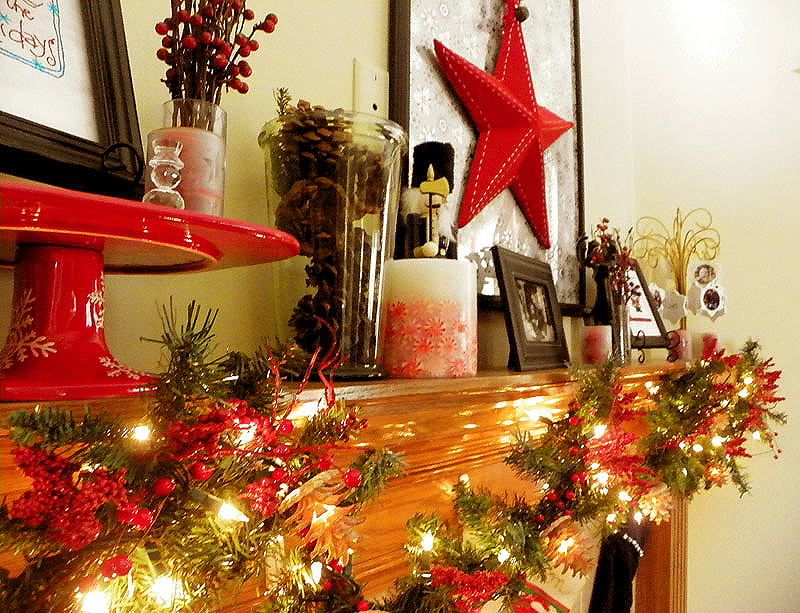
Finally, our mantel. Probably my favorite of everything this year.


I made the new Christmas art piece.


I used a $5 garage sale frame and painted it black, sanded it a bit, then varnished it with a very light coat. I covered the background with a pretty silver wrapping paper and put it behind the glass. On top of the glass, I hung the red felt star (from Target). Very easy and very cute, I think.


I also made the garland for the mantel. The evergreen garland itself is a cheap one from Jo-Ann's. I added two long red berry swags and a strand of lights. The pine cones are actually light covers from another strand of lights that I used here instead. I also stuck some Christmas holly picks in the garland after I hung it on the mantel.


I also framed a few new stitching projects I finished up this year.


"Home for the Holidays" is a free pattern from You Can Make This.com. I love the red with the turquoise - such happy, festive colors.


The Santa cross-stitch is a kit from Jo-Ann's. Very simple but cute.

At night, the lights on the tree and the mantel make everything look beautiful.


That's it for our Christmas tour - hope you had a wonderful holiday!

Tuesday, December 20, 2011

Ornament Wreath

I love this wreath! I've seen several ornament wreaths on Pinterest and have seen them in the stores for a few years - and I finally thought, surely I can make one too. I followed this great tutorial. It wasn't hard - it just takes awhile!


I started with an 18-inch straw wreath. I thought this would be too small of a wreath, but when you get all the ornaments glued on, it's really a lot bigger than you might think.


I wrapped the straw wreath with silver tinsel and then started hot-gluing my plastic ornaments on. And gluing. And gluing. It does take awhile. You have to glue a bit, then hold the ornament in place until it sets up a bit before you can move on to the next one.


The end result is gorgeous though - so, it's worth it!


It's now hanging proudly in my foyer over top of my old window frames. So beautiful!


More Christmas-goodness coming soon!

Linking up to these parties:


Monday, December 19, 2011

Fall Wreath

Well, it feels like I jumped right from Halloween into Christmas. Before we get into the Christmas projects, I did want to share the one fall project I did - a new wreath for my foyer. I'm kind of wreath-obsessed right now, I guess. I love how this one turned out.


I was inspired by this wreath - I loved that monogram letter. I found my letter at Jo-Ann's and painted it black and then bronze over top. Very fall-ish.


The wreath itself is a grapevine wreath from Hobby Lobby. I got a couple of fall leaf garlands from Hobby Lobby too, the very cheapest ones, since I only wanted them to fill in the background. I then hot-glued the gourds and flowers in place. There are a few fall picks in there too. Love it!


Okay, I think that's it for fall. Next up, I'll be sharing Christmas projects...

Sharing at these great parties...

Fox Hollow Cottage

Tuesday, October 11, 2011

Window Frames

I was so excited to pick up these 4 old window frames at a garage sale for $5 each. I think I probably could have talked him down a bit, but I was just too thrilled to find them and afraid someone else would snatch them away. Aren't they lovely?

They were so dirty and chippy. My first task was to scrub them down a bit with a wire brush and hose them off. After I let them dry for a day, I glued the frames together at the joints. They were a bit wobbly, and I didn't want them falling apart any more than they were. After the glue dried, they were nice and tight.

I then added a bit more white paint to cover up the glue and to add some additional distressing. I just slapped the paint on and then rubbed it off with a clean cloth. Nothing fancy.

I had a plan for where to hang these now-lovely window frames. Remember my plain old foyer?


Yeah, it could use some sprucing up. So I hung up 2 of the window frames on the bigger wall.


My plan is to use this space as a backdrop for my seasonal decor - and it's the perfect place to hang an inside wreath. I love how it looks! They are just the perfect amount of distressed wood and chippy paint.


So pretty! I have a Halloween wreath to show you next...Yay!

Linking up to these parties:

    Tip Junkie handmade projects        
Related Posts Plugin for WordPress, Blogger...