Wednesday, March 05, 2014

How To: Create a Background With Tags and Cards

Hello all! I'm so excited to share a fun project with you today. It's a layout for the March Sketch Challenge at Practical Scrappers. I love this month's sketch, designed by the oh-so-talented Christine Meyer.

March Layout Sketch for Practical Scrappers

Those circles are so fun, and they inspired to me to put together a background pattern created from cards and tags. You know how you get those packs of journaling cards and tags with paper collections and there are so many that you aren't sure how you'll ever use them up? :) Here's a great way to use a lot of them on your page at once...

Boys Rule layout based on the March sketch at Practical Scrappers -- www.MightyCrafty.me

I love how this page turned out! I used the Boys Rule collection from Crate Paper. This line is amazing and has lots of boys elements mixed with trendy patterns and colors.

To create a layered background with cards and tags:
  1. Just like the sketch, layer the cards and tags around your background until you get a look you like.
  2. Adhere the cards and tags down. Use just a strip of adhesive in the middle of the back of each tag or card, so that you can easily layer other cards or tags under if you want to.
  3. Keep layering and arranging, adhering as you go.
  4. Place your photo on top (with a fun frame or mat background to help it stand out).
  5. Finally, layer on the little pieces of bling or embellishments to give your page that special touch.

Boys Rule layout based on the March sketch at Practical Scrappers -- www.MightyCrafty.me

Boys Rule layout based on the March sketch at Practical Scrappers -- www.MightyCrafty.me

Boys Rule layout based on the March sketch at Practical Scrappers -- www.MightyCrafty.me

I love this sketch! What a fun way to feature a photo that you love and want to showcase in your family scrapbooks. Thank you, Christine, for an amazing sketch!

Until next time,
Stay crafty!
Lissa :)


Tuesday, March 04, 2014

Blog Hop for Xyron and Miss Kate Cuttables -- Plus a Giveaway!

Xyron and Miss Kate Cuttables Blog Hop
Update 3/11/14: Congratulations Sue D --  you are the winner of the Miss Kate Cuttable gift certificate. Email me at MightyCraftyDOTmeATgmailDOTcom to claim your prize. :)


 Hello all! We have a fun blog hop for you today with an amazing team-up between two wonderful scrapbooking companies: Xyron and Miss Kate Cuttables!

Plus, I'm giving away a gift certificate to Miss Kate Cuttables to celebrate. Read on to find out how to enter...

I was thrilled to join in on this blog hop -- Xyron creates my absolute favorite go-to adhesives. I use their glue and tape products every day in my paper crafting projects. As part of this blog hop, Xyron generously sent us some amazing goodies to play with:

Xyron Sticker Maker, High Tack Tape, and Glue Stick

I was excited to get started and see how these new products worked. For today's blog hop, I created this layout:

Fireside Fun for Miss Kate Cuttables and Xyron -- www.MightyCrafty.me

And let me tell you, those new Xyron adhesives were perfect when putting together my die cuts from Miss Kate Cuttables. I combined these cut file sets from Miss Kate:

Camping Backgrounds and Overlays by Miss Kate Cuttables


Fireside Fun by Miss Kate Cuttables


Gimme Smores by Miss Kate Cuttables

Gimme S'mores

To create my layout, I used The Great Outdoors collection and the Happy Camper collection -- both by Echo Park. After I cut everything out with my Silhouette and inked the edges, I used my new Xyron adhesives to put everything together.

The 3-inch Sticker Maker was so easy to use and gave me a perfectly even layer edge-to-edge on my delicate die cut pieces, making them super easy to layer together.

Xyron Sticker Maker

I used the High Tack Tape to really stick those edges down too.

Xyron High Tack Tape

And finally, the Glue Stick with the awesome corner edge was perfect to glue down my background overlay and all those little pieces on my die cuts.

Fireside Fun for Miss Kate Cuttables and Xyron -- www.MightyCrafty.me

Fireside Fun for Miss Kate Cuttables and Xyron -- www.MightyCrafty.me

Fireside Fun for Miss Kate Cuttables and Xyron -- www.MightyCrafty.me


I just love how this project turned out -- thanks to Xyron and Miss Kate Cuttables!

Fireside Fun for Miss Kate Cuttables and Xyron -- www.MightyCrafty.me

I hope you will head over to the Miss Kate Cuttables and Xyron blogs for more blog hop fun and inspiration:
But before you go, be sure enter to win a fabulous prize from me -- a $5 gift certificate to the Miss Kate Cuttables store. And believe me, $5 at Miss Kate's store gets you a ton of electronic die-cutting awesomeness. :) To enter, just do one of these:

  • Subscribe to my blog (in the left nav) via Google or email and leave a comment on this post telling me you're all signed up.
  • Like my Facebook page and leave me a quick post there telling me you did it.
I'll announce the random winner on March 11. Be sure to enter before midnight MST on March 10. 

Good luck and stay crafty!
Lissa :)

Saturday, March 01, 2014

Sketch 'N Scrap Sketch #52 Layout

I'm here today to share my design team layout for Sketch #52 at Sketch 'N Scrap. Each month, they offer two layout sketches and two card sketches. And if you link up your creation, you'll be entered to win a great prize package. Awesome!

I love working with the sketches from Sketch 'N Scrap -- they are so fun to create with. Here's sketch #52:

Sketch #52 from Sketch 'N Scrap


And here's my interpretation of it...

Layout for Sketch #52 from Sketch 'N Scrap -- Just Treats -- www.MightyCrafty.me

Yes, I know it's March, but I was in the mood for Halloween. (When am I not, really?) I loved the two-sided design in this sketch, so I decided to use this circle overlay from Maya Road. It's made of a plastic material that is fun and kind of shiny. I cut it into a 6" strip and then cut off another circle to add to the right-side to create some continuity. The Halloween papers and embellishments are from Bo Bunny. So cute!

Layout for Sketch #52 from Sketch 'N Scrap -- Just Treats -- www.MightyCrafty.me

Layout for Sketch #52 from Sketch 'N Scrap -- Just Treats -- www.MightyCrafty.me

Layout for Sketch #52 from Sketch 'N Scrap -- Just Treats -- www.MightyCrafty.me


Be sure to play along with the sketch challenge this month (and every month!). Don't forget -- if you link up your layout at Sketch 'N Scrap, you'll be entered to win a great prize giveaway!

Stay crafty,
Lissa :)

Thursday, February 27, 2014

February Kit Wrap-Up

February Kit Wrap-Up -- www.MightyCrafty.me
It's the end of February -- that means it's time to wrap-up the projects I created this month with my February kit. I wasn't able to kill of the kit, but I did create quite a few projects that I loved...

1. Puppy Love layout for the Sketch N Scrap sketch #50 challenge:

Puppy Love -- Sketch layout for Sketch N Scrap -- www.MightyCrafty.me

2. Sketch layout for Practical Scrappers' February sketch:

So Lucky -- Sketch layout for Practical Scrappers -- www.MightyCrafty.me

3. All You Need Is Love for Miss Kate Cuttables:

All You Need Is Love for Miss Kate Cuttables -- www.MightyCrafty.me

4. Valentine card set for the Practical Scrappers' February blog hop:

Valentine Card Set -- www.MightyCrafty.me

5. Sketch layout for Sketch N Scrap #51 sketch challenge:

My Love -- Sketch layout for Sketch N Scrap -- www.MightyCrafty.me

That's a pretty good month of projects!

Now for the question of a March kit. I've been thinking about this a lot, and I think I'm not going to make a kit for March. I have loved doing this project -- but the biggest thing it has taught me over the last three months is how to use my stash effectively. And now, I'm doing that more than ever. I have rediscovered a lot of papers and embellishments that I want to use on my upcoming projects, so I think skipping a monthly kit for March is a good idea.

I'll be back soon with more scrapbooking projects and ideas -- until then,

Stay crafty!
Lissa :)


Tuesday, February 25, 2014

Ferocious Friends for Miss Kate Cuttables

I'm back on the Miss Kate Cuttables blog today with another project for February -- this time, it's a fun layout idea you can use for boys or girls. Here's a sneak peek...

Ferocious Friends for Miss Kate Cuttables -- www.MightyCrafty.me

It's seriously adorable, if I do say so myself.  I used some cute dinosaur papers, my Kiwi Lane templates, and these cut files from Miss Kate Cuttables:
Ferocious Friends cut file by Miss Kate Cuttables
Volcano cut file by Miss Kate Cuttables

So head on over to the Miss Kate Cuttables blog to check out my project and let me know what you think!

Stay crafty!
Lissa :)


Sunday, February 23, 2014

Stitch Fix: February 2014

Feb. 2014 Stitch Fix review -- www.MightyCrafty.me

It's time for another Stitch Fix review -- I love getting my monthly Stitch Fix boxes! It's like a gift I give to myself. :) (Note: Stitch Fix offers a referral credit for affiliate links, which I have included in this post. I will receive a $25 credit if you sign-up using my Stitch Fix link. Thank you for your support!)

If you haven't heard of Stitch Fix, it's a monthly subscription box service. You pay a $20 styling fee and fill out a detailed style questionnaire -- then the Stitch Fix stylists pick out five clothing and accessory items to send you. You keep only what you love and send the rest back in their pre-paid shipping envelope. Your $20 styling fee is applied as a credit toward what you keep -- and if you keep all five pieces, you get an additional 25% off the total.

Feb. 2014 Stitch Fix review -- www.MightyCrafty.me

Alexandra styled me again this month, and I had so much fun trying on everything she picked out. I love that she included suggestions for pairing up items from this Fix with items she knows I kept in previous Fixes. I need that help!

First out of the box was this AMAZING Alan Cowl Neck Asymmetrical Jacket by Sweet Rain ($58). Even before I tried it on, I knew, barring any unforeseen fit issues, I would keeping it. And I was right. It was awesome. Super soft, like a sweatshirt, yet a fun and unique shape. I admit, I wear a hoodie sweatshirt pretty much every day, so this jacket definitely steps up my style by a lot. I have worn it almost constantly since I opened my Fix.

Feb. 2014 Stitch Fix review -- Alan Cowl Neck Asymmetrical Jacket by Sweet Rain -- www.MightyCrafty.me

Next up was this Fullerton Plaid Print Short Sleeve Blouse by Collective Concepts ($58). It had a super cute plaid print and cap sleeves but it was just too tight on me. Sigh. I wanted to keep it but I had to send it back.

Feb. 2014 Stitch Fix review -- Plaid Print Short Sleeve Blouse by Collective Concepts -- www.MightyCrafty.me

Third was this Moni Stud Detailed 3/4 Sleeve Blouse by 41Hawthorn ($48). It was cute and I loved the stud details (plus I love black!) but it was too tight across my hips. I would have kept this one except for that. I need to lose some weight. Sigh. Or learn to sew vents in my shirts.

Feb. 2014 Stitch Fix review -- Moni Stud Detailed 3/4 Sleeve Blouse by 41Hawthorn -- www.MightyCrafty.me

And now that I'm seeing the photo again while I blog this, I kind of wish I had kept this one. Oh well...

Next was this Amani Cowl Neck Sleeveless Blouse by 41Hawthorn ($58) in a beautiful purple that I loved. But I couldn't get the cowl next to look right on me. My girls are just too big for cowl necks, I think. I had to send it back.

Feb. 2014 Stitch Fix review -- Amani Cowl Neck Sleeveless Blouse by 41Hawthorn -- www.MightyCrafty.me

Finally, this lovely Ella Multi-Color Ovals Necklace by Bay to Baubles ($28). I loved it. But I had just bought a very similar necklace. :( So this one had to go back too.

Feb. 2014 Stitch Fix review -- Ella Multi-Color Ovals Necklace by Bay to Baubles -- www.MightyCrafty.me

In the end, I only kept one piece from this Fix -- the Asymmetrical Jacket. Which I'm wearing constantly. Even though I sent back four of the five pieces, I still LOVED getting my Stitch Fix this month. And I cannot wait until the next one. If you are looking to update your wardrobe with fashionable pieces, this is the subscription service you need to try.

Until next time,

Stay crafty (and fashionable)!
Lissa :)

Friday, February 21, 2014

How To: Cookie Cutter Background

Hello all! I'm here today to share a quick tutorial for making your own unique background papers. This is part of the Frugal Finds feature this month for Practical Scrappers. I love this monthly challenge -- to use something you probably have around the house to create something beautiful for your scrapbooks or home.

This month, our theme was cookie cutters. There are so many things you can do with cookie cutters -- I decided to use a star cookie cutter to create this beautiful and unique background paper:

Cookie cutter glittered background -- Christmas Eve -- www.MightyCrafty.me

Creating this background is super easy, even if it is a bit messy. :) Glitter does tend to get everywhere, but it's a small price to pay, right?
  1. To get started, choose your cookie cutter, background paper, glitter, and an acrylic paint that will match your glitter. That's right -- instead of using glue or tape to hold the glitter, we're going to use acrylic paint.
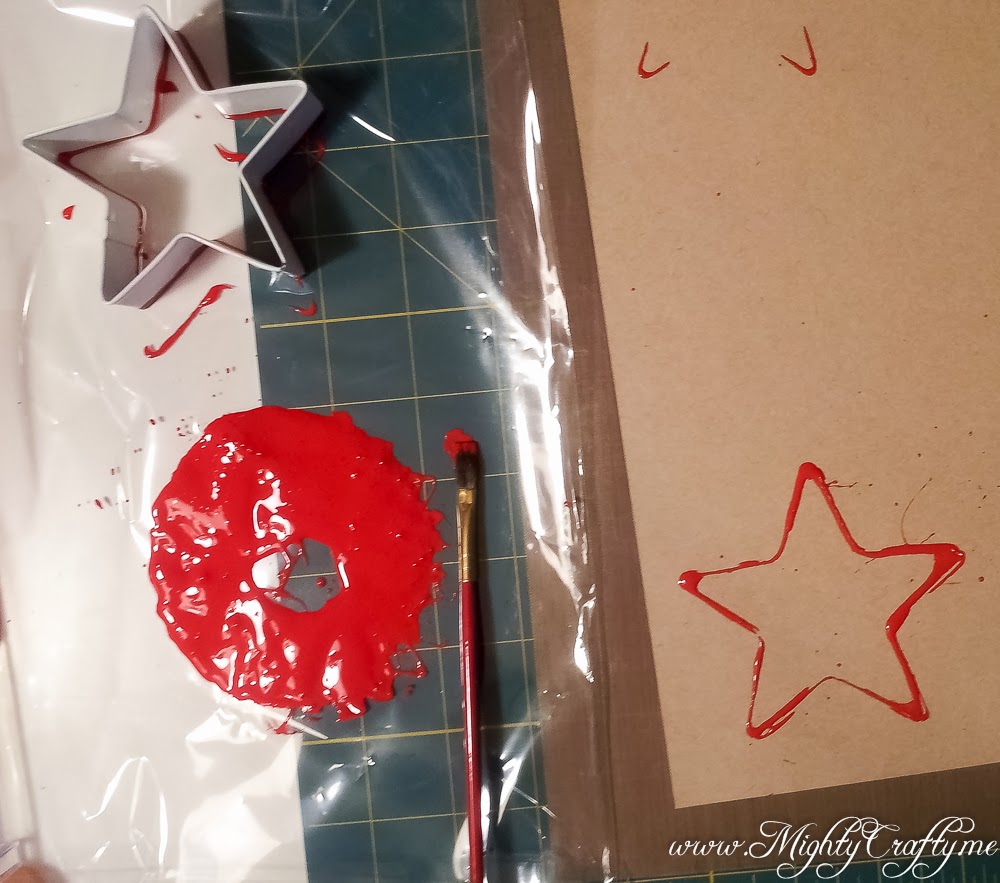
  2. Make a small pool of your acrylic paint, then dip your cookie cutter into the paint, covering all the sides. A small paintbrush can help get the paint onto your cookie cutter.

    Paint and cookie cutters -- www.MightyCrafty.me

  3. Stamp your image. This can take some finagling and practice, depending on your cookie cutter. And it won't be perfect -- but that's part of the charm.
  4. Sprinkle the paint-stamped image with glitter, then shake off the excess.

    Glitter and cookie cutters -- www.MightyCrafty.me

  5. Admire your work. :)

    Glitter and cookie cutters -- www.MightyCrafty.me
Super easy! Now, just repeat the design across your background paper. I love how it turned out -- just the right amount of glitter with a shabby chic look.

Cookie cutter glittered background paper -- www.MightyCrafty.me

With this paper as my background, I put the rest of my layout together, using papers from Webster's Pages and bits and pieces from my stash. I also cut out the Christmas title with my Silhouette Cameo, using a word from this cut file set from Miss Kate Cuttables.

Cookie cutter glittered background -- Christmas Eve -- www.MightyCrafty.me

Cookie cutter glittered background -- Christmas Eve -- www.MightyCrafty.me

I encourage you to try this technique -- it's fun and easy, and I love that it uses items you probably have at home. If you create something with cookie cutters, be sure to link it up over at Practical Scrappers. We would love to see your projects.

Until next time,

Stay crafty!
Lissa :)


Tuesday, February 18, 2014

Tip Time Tuesday for Kiwi Lane Designs Plus a Giveaway

Updated 2/25/14: Congratulations to Sue D -- you're the winner of the Kiwi Lane templates giveaway. Email me at MightyCraftyDOTmeATgmailDOTcom to claim your prize. :)


 I'm back on the Kiwi Lane Designs blog today with a new feature for Tip Time Tuesday. I have created some fun and unique designs with my Kiwi Lane Sweetheart and Paradise template set this month. And to celebrate, I'm giving away an awesome set of Kiwi Lane accessory templates -- read on to find out how to win!

Tip Time Tuesday for Kiwi Lane Designs with Hemptique -- www.MightyCrafty.me

For February's projects, the Kiwi Lane design team got to work with Hemptique -- they create the most beautiful twine and cording in all kinds of glorious color combinations. I had so much fun working it! Be sure to visit Hemptique's Facebook page for more ideas.

Tip Time Tuesday for Kiwi Lane Designs with Hemptique -- www.MightyCrafty.me


The featured Kiwi Lane designer templates for February are the Sweetheart and Paradise accessory sets. These two sets have such great shapes that work so well together. You'll have to head on over to the Kiwi Lane blog to see my project...

But before you go, you must enter to win your very own set of Kiwi Lane Tiny Sweetheart Accessory templates. To enter, just do one of these:
  • Subscribe to my blog (in the left nav) and leave a comment on this post telling me you're all signed up.
  • Like my Facebook page and leave me a quick post there telling me you did it.
I'll announce the random winner on Feb. 25. Be sure to enter before midnight MST on Feb. 24. (I can only ship to United States -- thank you for your understanding.)

Good luck and stay crafty!
Lissa :)

Monday, February 17, 2014

Kiwi Lane DT Doodles #4

It's time for another awesome sketch from Kiwi Lane -- my favorite days of the month! This week, they've created a double-page sketch with room for lots of photos.

http://kiwilane.com/dt-doodles-20134/#.Uw4XFIVPmzk

And don't forget -- when you link up your own creation of the sketch, you'll be entered to win a great prize drawing. 

Here's what I created with the sketch:


So pretty! These are my parents way back in 1973 -- love these photos. I used lots of vintage-y, glittery papers from My Mind's Eye, plus these Kiwi Lane templates:
  • Madison Avenue 1A, 1B, 2A, 2B, 3A, 3B
  • Cascade Trails 2B
  • Mini Scallops 1A
  • Sweetheart 2, 3, 4
  • Tiny Sweetheart 2T, 3T, 4T
  • Tiny Brackets 1T
  • Strips 1", 1/2"


I love all the fun layers in this sketch -- thank you Kiwi Lane! Be sure to head over to Kiwi Lane today and link up your layout creation so you'll be entered to win that awesome gift card!

Until next time -- stay crafty!
Lissa :)

Related Posts Plugin for WordPress, Blogger...