Showing posts with label Silhouette. Show all posts

Tuesday, April 15, 2014

Miss Kate Cuttables and Peachy Keen Stamps Blog Hop

Peachy Keen Stamps & Miss Kate Cuttables Blog Hop

I'm so excited to be a part of the Peachy Keen Stamp and Miss Kate Cuttables blog hop this week!

Each day, there are new projects posted at the Miss Kate Cuttables and Peachy Keen Stamps blog that you will not want to miss. And there are amazing prizes up for grabs!
  • EACH DAY Miss Kate Cuttables is giving away a free cut file to everyone who comments and follows on the Design Teams' blog hop post. Be sure to comment on THIS post and FOLLOW my blog to claim your prize!
  • For your FREE cut file code, email TheScrapbookingQueen1@gmail.com (after commenting and following my blog -- this will be confirmed before code is sent).
  • GRAND PRIZE by Miss Kate Cuttables is a $25 Gift Certificate to someone who hops with us each day this week by commenting and following each blog on the hop. Don't miss any days in the commenting and following to be sure to be in the drawing for this awesome prize!
  • EACH DAY Peachy Keen Stamps is giving away a $25 gift certificate -- One person will be chosen who has hopped to each blog for that day, left a comment on each blog, and FOLLOWED each blog.
  • GRAND PRIZE by Peachy Keen Stamps is a $75 Gift Certificate to one lucky person who follows the hop each day, comments on each blog post, and follows each blog. Don't miss any days in the commenting and following to be sure to be in the drawing for this awesome prize!
  • Be sure to LIKE Miss Kate Cuttables and Peachy Keen Stamps on Facebook too!
There are so many talented ladies in this blog hop, and I'm honored to be joining them. I had so much fun designing a project with Peachy Keen Stamps and Miss Kate Cuttables combined. I chose these adorable stamps from Peachy Keen Stamps and this cut file set from Miss Kate Cuttables:

Geared Up For Fun cut file from Miss Kate Cuttables

 And here's my layout:

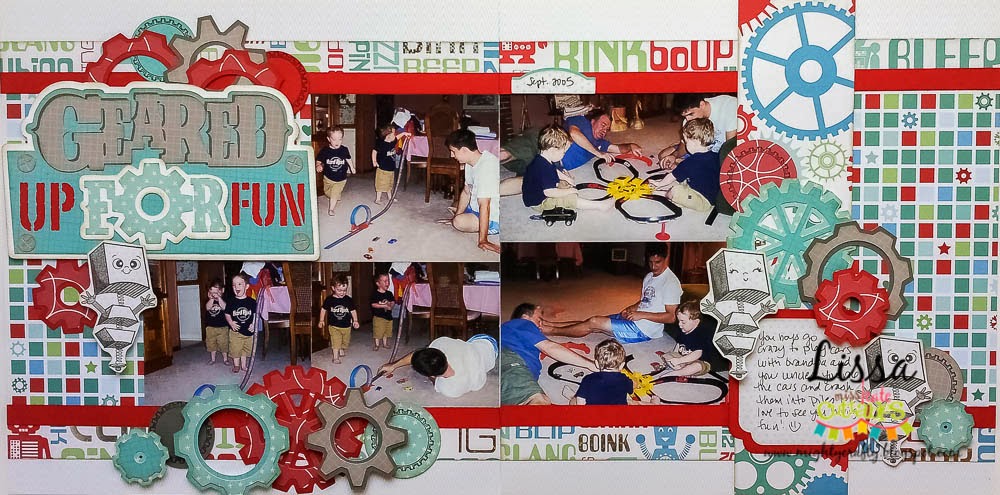
Geared Up For Fun layout for Miss Kate Cuttables and Peachy Keen Stamps -- www.MightyCrafty.me

I love how it turned out! These photos are from when my boys were only two years old (they're 10 now, sob!). The papers are from the Blips and Bleeps collection by TPC Studio. 

For the title, I cut the "Geared" word out of two different papers, layering the lighter gray pattern over top of the darker gray, to create a shadowed word. I didn't do any resizing -- I just offset the lighter word a bit to show the shadow behind. Super easy!

Geared Up For Fun layout for Miss Kate Cuttables and Peachy Keen Stamps -- www.MightyCrafty.me

I stamped the Peachy Keen Stamps robots onto a piece of white paper with light blue dots (also from the same paper collection) and then colored them in with colored pencils. Super easy and cute. I also stamped the Peachy Keen Stamps gears onto circles of the same pattern paper as the die cut gears.

Geared Up For Fun layout for Miss Kate Cuttables and Peachy Keen Stamps -- www.MightyCrafty.me

I used foam dots behind the robots and gears to give them some dimension from the page too. The colors are just so fun -- my favorite kind of page!

Geared Up For Fun layout for Miss Kate Cuttables and Peachy Keen Stamps -- www.MightyCrafty.me

Geared Up For Fun layout for Miss Kate Cuttables and Peachy Keen Stamps -- www.MightyCrafty.me

Oh my gosh -- I just about die from cuteness overload when I see these robots! Love!

Geared Up For Fun layout for Miss Kate Cuttables and Peachy Keen Stamps -- www.MightyCrafty.me

And no one does awesome titles like Miss Kate! I love this one.

So that's my project for today! Be sure to follow and comment on my post here today -- and then head over to the Miss Kate Cuttables blog and the Peachy Keen Stamps blog to see the rest of the blog hop projects. Follow and comment all week to get your free Miss Kate cut files and to be entered to win one of those awesome gift certificates!

Until next time...
Stay crafty!
Lissa :)


Tuesday, March 25, 2014

Cowgirl Layout for Miss Kate Cuttables

Hello everyone! I'm up on the Miss Kate Cuttables blog today with a fun, girly layout using lots of cut files from Miss Kate...

Yee Haw layout for Miss Kate Cuttables -- www.MightyCrafty.me

I just love how it turned out...

Yee Haw layout for Miss Kate Cuttables -- www.MightyCrafty.me

Head on over to the Miss Kate Cuttables blog to check it out and let me know what you think!

Stay crafty!
Lissa :)

Tuesday, March 04, 2014

Blog Hop for Xyron and Miss Kate Cuttables -- Plus a Giveaway!

Xyron and Miss Kate Cuttables Blog Hop
Update 3/11/14: Congratulations Sue D --  you are the winner of the Miss Kate Cuttable gift certificate. Email me at MightyCraftyDOTmeATgmailDOTcom to claim your prize. :)


 Hello all! We have a fun blog hop for you today with an amazing team-up between two wonderful scrapbooking companies: Xyron and Miss Kate Cuttables!

Plus, I'm giving away a gift certificate to Miss Kate Cuttables to celebrate. Read on to find out how to enter...

I was thrilled to join in on this blog hop -- Xyron creates my absolute favorite go-to adhesives. I use their glue and tape products every day in my paper crafting projects. As part of this blog hop, Xyron generously sent us some amazing goodies to play with:

Xyron Sticker Maker, High Tack Tape, and Glue Stick

I was excited to get started and see how these new products worked. For today's blog hop, I created this layout:

Fireside Fun for Miss Kate Cuttables and Xyron -- www.MightyCrafty.me

And let me tell you, those new Xyron adhesives were perfect when putting together my die cuts from Miss Kate Cuttables. I combined these cut file sets from Miss Kate:

Camping Backgrounds and Overlays by Miss Kate Cuttables


Fireside Fun by Miss Kate Cuttables


Gimme Smores by Miss Kate Cuttables

Gimme S'mores

To create my layout, I used The Great Outdoors collection and the Happy Camper collection -- both by Echo Park. After I cut everything out with my Silhouette and inked the edges, I used my new Xyron adhesives to put everything together.

The 3-inch Sticker Maker was so easy to use and gave me a perfectly even layer edge-to-edge on my delicate die cut pieces, making them super easy to layer together.

Xyron Sticker Maker

I used the High Tack Tape to really stick those edges down too.

Xyron High Tack Tape

And finally, the Glue Stick with the awesome corner edge was perfect to glue down my background overlay and all those little pieces on my die cuts.

Fireside Fun for Miss Kate Cuttables and Xyron -- www.MightyCrafty.me

Fireside Fun for Miss Kate Cuttables and Xyron -- www.MightyCrafty.me

Fireside Fun for Miss Kate Cuttables and Xyron -- www.MightyCrafty.me


I just love how this project turned out -- thanks to Xyron and Miss Kate Cuttables!

Fireside Fun for Miss Kate Cuttables and Xyron -- www.MightyCrafty.me

I hope you will head over to the Miss Kate Cuttables and Xyron blogs for more blog hop fun and inspiration:
But before you go, be sure enter to win a fabulous prize from me -- a $5 gift certificate to the Miss Kate Cuttables store. And believe me, $5 at Miss Kate's store gets you a ton of electronic die-cutting awesomeness. :) To enter, just do one of these:

  • Subscribe to my blog (in the left nav) via Google or email and leave a comment on this post telling me you're all signed up.
  • Like my Facebook page and leave me a quick post there telling me you did it.
I'll announce the random winner on March 11. Be sure to enter before midnight MST on March 10. 

Good luck and stay crafty!
Lissa :)

Friday, February 21, 2014

How To: Cookie Cutter Background

Hello all! I'm here today to share a quick tutorial for making your own unique background papers. This is part of the Frugal Finds feature this month for Practical Scrappers. I love this monthly challenge -- to use something you probably have around the house to create something beautiful for your scrapbooks or home.

This month, our theme was cookie cutters. There are so many things you can do with cookie cutters -- I decided to use a star cookie cutter to create this beautiful and unique background paper:

Cookie cutter glittered background -- Christmas Eve -- www.MightyCrafty.me

Creating this background is super easy, even if it is a bit messy. :) Glitter does tend to get everywhere, but it's a small price to pay, right?
  1. To get started, choose your cookie cutter, background paper, glitter, and an acrylic paint that will match your glitter. That's right -- instead of using glue or tape to hold the glitter, we're going to use acrylic paint.
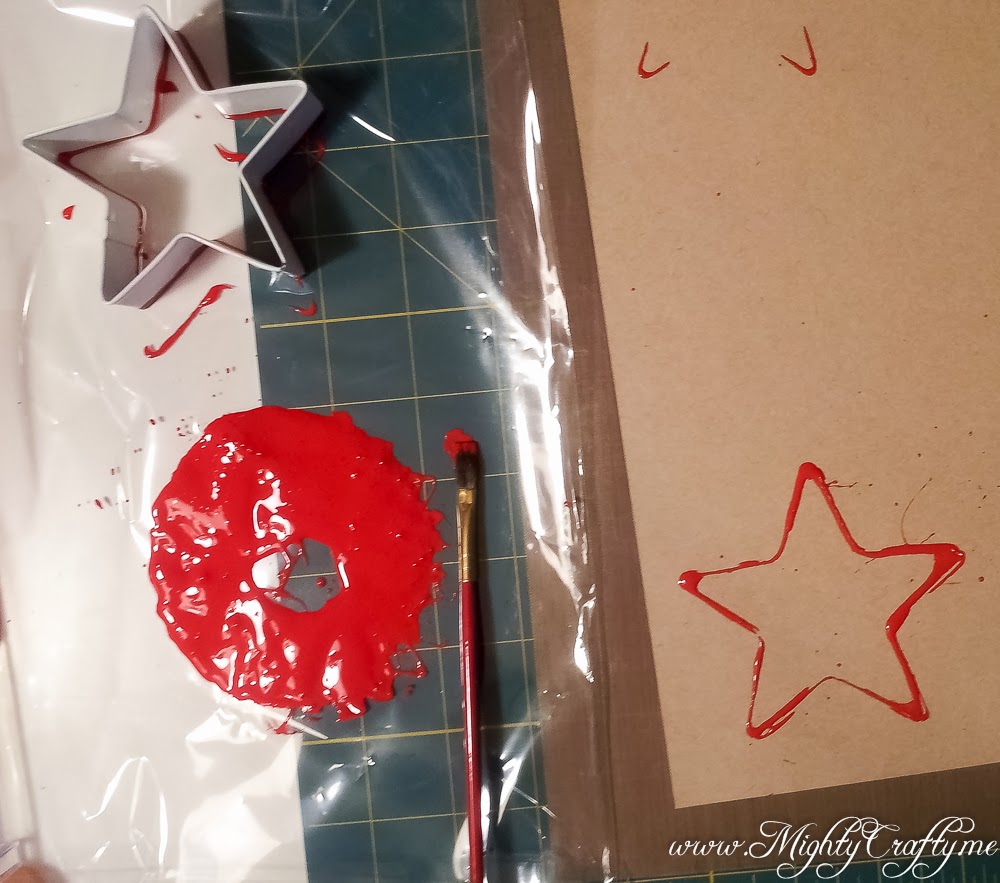
  2. Make a small pool of your acrylic paint, then dip your cookie cutter into the paint, covering all the sides. A small paintbrush can help get the paint onto your cookie cutter.

    Paint and cookie cutters -- www.MightyCrafty.me

  3. Stamp your image. This can take some finagling and practice, depending on your cookie cutter. And it won't be perfect -- but that's part of the charm.
  4. Sprinkle the paint-stamped image with glitter, then shake off the excess.

    Glitter and cookie cutters -- www.MightyCrafty.me

  5. Admire your work. :)

    Glitter and cookie cutters -- www.MightyCrafty.me
Super easy! Now, just repeat the design across your background paper. I love how it turned out -- just the right amount of glitter with a shabby chic look.

Cookie cutter glittered background paper -- www.MightyCrafty.me

With this paper as my background, I put the rest of my layout together, using papers from Webster's Pages and bits and pieces from my stash. I also cut out the Christmas title with my Silhouette Cameo, using a word from this cut file set from Miss Kate Cuttables.

Cookie cutter glittered background -- Christmas Eve -- www.MightyCrafty.me

Cookie cutter glittered background -- Christmas Eve -- www.MightyCrafty.me

I encourage you to try this technique -- it's fun and easy, and I love that it uses items you probably have at home. If you create something with cookie cutters, be sure to link it up over at Practical Scrappers. We would love to see your projects.

Until next time,

Stay crafty!
Lissa :)

Tuesday, January 28, 2014

Sledding Fun with Miss Kate Cuttables

I'm back today on the Miss Kate Cuttables blog with my second project for January -- a fun winter layout. Here's a little sneak peek...

Sledding Fun layout with Miss Kate Cuttables -- www.MightyCrafty.me

To create the layout, I used my January kit plus these super fun cut files from Miss Kate:

http://www.misskatecuttables.com/products/product/sledding-fun.php
Sledding Fun
http://www.misskatecuttables.com/products/product/snow-memories.php
Snow Memories
So head on over to the Miss Kate Cuttables blog to check it out and let me know what you think!

Stay crafty!
Lissa :)

Tuesday, January 14, 2014

Bundled Up With Love for Miss Kate Cuttables

I'm super excited to say that my first very first feature for Miss Kate Cuttables is up on her new blog today! Here's a little sneak peek... 

Bundled Up With Love for Miss Kate Cuttables -- www.mightycrafty.me

It's a very fun winter layout using my January kit plus these awesome cut file sets from Miss Kate:

Assorted Snowflakes Set by Miss Kate Cuttables
Assorted Snowflake Set
Bundled Up With Love by Miss Kate Cuttables
Bundled Up With Love

Head on over to the Miss Kate Cuttables blog to check it out and let me know what you think!

Stay crafty!
Lissa :)

Friday, December 13, 2013

Giddy Up with Miss Kate Cuttables

Today, I'm sharing yet another fun layout created using a set of cut files from Miss Kate Cuttables. I just can't stop using these cut files. They are so fun to make.

For this layout, I used the Giddy Up set to showcase some favorite photos of my boys when they were very little and in love with their rocking horses.

Giddy Up with Miss Kate Cuttables -- www.MightyCrafty.me

Giddy Up with Miss Kate Cuttables -- www.MightyCrafty.me

Giddy Up with Miss Kate Cuttables -- www.MightyCrafty.me

I have had these cowboy papers in my stash for a long, long time, just waiting to be used on a page like this. I used my Kiwi Lane designer templates to create the background layers, and then just arranged the photos and the layered die cuts over top.

Giddy Up with Miss Kate Cuttables -- www.MightyCrafty.me

Giddy Up with Miss Kate Cuttables -- www.MightyCrafty.me

Giddy Up with Miss Kate Cuttables -- www.MightyCrafty.me

Giddy Up with Miss Kate Cuttables -- www.MightyCrafty.me

So glad to get these photos scrapped and into our family albums. I miss these days so much, and scrapbooking about it helps me to remember how sweet those days were.

What scrapbooking projects have you been creating lately? Please share...

Thursday, October 10, 2013

Backyard Love with Miss Kate Cuttables

I've been loving my Silhouette Cameo lately. It helps so much to have fun Miss Kate Cuttables files to play with. Today, I'm sharing a layout featuring our love of our backyard. Our home in Kansas City had a big backyard with lots of big trees, and the boys loved to play outside on the swing set.

I found the perfect set of cut files from Miss Kate Cuttables for this page -- Playing in the Park.


I used an Echo Park collection kit for the papers and layered together the pieces to create all the embellishments. I also used my Kiwi Lane designer templates to create the background layers.


I created the title using a few fonts and then used the offset feature to create a double mat.


I love that the playset looks exactly like the one we had in our yard.


A fun layout showcasing some of our favorite memories from our home in Kansas City. We miss that backyard so much.

Have you created any layouts of your backyard? Please share...
Related Posts Plugin for WordPress, Blogger...