Sometimes, while I'm cleaning up my craft table after creating a layout, I realize I have way too many scraps.
I keep all my paper scraps in a little basket on my table. It's handy to have them there so I can grab a small piece of something when I need it. But when the basket gets too full, I know I need to do something to clear out some of the scraps. Sometimes I'll make a card. Sometimes I'll punch a bunch of shapes to put in my color drawers.
This time, I made a layout just from scraps.
I sorted through my scraps to find dark, grungy patterns...
I pulled out several that were in the same color family, then trimmed them into 3-inch strips. I layered the strips along the side of the photograph in a single column. Color mist over top helped to unify everything together. Love it...
I did a bit more stash-busting too by using rub-on words and shapes to create the embellishment collage. I have stacks of those Making Memories rub-ons from years ago but I still love them too much to part with them. So I used a bunch on this layout too.
Do you have a bunch of scraps laying around? Try this easy way to use them up. I'd love to see what you create...
Saturday, June 30, 2012
Thursday, June 28, 2012
DIY Quilted eReader Cover
I love my Kobo eReader. It's not fancy. It's not in color. It's doesn't have a touch-screen. It's incredibly basic. But I love it. I'm an avid reader (see my Goodreads.com widget on the sidebar for what I'm reading right now). And I use my Kobo every single day.
I knew I needed a cover for it but I hadn't found anything that really liked. I wanted to sew something but for some reason or another, the project never made it to the top of my to-do list. Until last week.

I found this iPad Cover Tutorial from One Shabby Chick and I knew it was the one I wanted to make. I love that it has the velcro closure. Most of the patterns I found had a zipper or something fancy for the closure, and I'm too impatient (and not a good enough sewer) for that. Velcro was perfect.
I had all the necessary supplies on hand - and I got to use up (almost) the last of my Basic Grey Origins charm pack.
I quilted the rest of the squares together to make a solid piece of fabric for the outer layer and inner layer.
I love how it turned out. Here's the back...
The tutorial has easy-to-follow instructions - the only change I made was to make it a little larger than I needed so that I could fit my power cord and clip-on light into the pouch with the eReader (for easy travel). Thank you One Shabby Chick for the great pattern...
Linking up to:


I knew I needed a cover for it but I hadn't found anything that really liked. I wanted to sew something but for some reason or another, the project never made it to the top of my to-do list. Until last week.

I found this iPad Cover Tutorial from One Shabby Chick and I knew it was the one I wanted to make. I love that it has the velcro closure. Most of the patterns I found had a zipper or something fancy for the closure, and I'm too impatient (and not a good enough sewer) for that. Velcro was perfect.
I had all the necessary supplies on hand - and I got to use up (almost) the last of my Basic Grey Origins charm pack.
I quilted the rest of the squares together to make a solid piece of fabric for the outer layer and inner layer.
I love how it turned out. Here's the back...
The tutorial has easy-to-follow instructions - the only change I made was to make it a little larger than I needed so that I could fit my power cord and clip-on light into the pouch with the eReader (for easy travel). Thank you One Shabby Chick for the great pattern...
Linking up to:

Monday, June 25, 2012
Product Review: Xyron Creatopia Shapez
I've become a bit of a die-cutting fiend lately. I love cutting my own letters, borders, and journaling shapes out of any paper I choose. I currently have a Big Shot die cutting machine and a Quickutz Revolution. Both machines are great. But it was a bit of a pain to have 2 machines, storage- and space-wise. Plus I like to add adhesive to my paper before cutting it, so I had a third large machine in play - the Xyron Creatopia. I LOVE my Creatopia for putting an even layer of adhesive on my die cut projects. But having to get out all three machines while I was scrapping made me not want to get any of them out.
So one day I was browsing around the web and discovered that I could get a die cut machine that fits inside my Creatopia - the Creatopia Shapez. And I realized that all my prayers were answered. (Okay, I can get a little overly excited about little things.) And we had a garage sale coming up, so if I could sell my Revolution and my Big Shot, I'd have a single machine to do all my die cutting and adhesive-ing (a word I made up). That got me really excited.
I ordered the Shapez set from Create For Less (it's out of stock right now, but you can still get it from Xyron.com). I had to try it out as soon as it arrived.

The process of taking the adhesive cartridge and rolling wheel out of the Creatopia is easy once you get the hang of it. And the die press fits right inside the Creatopia - the platform then folds down to make a nice surface to roll the plates through. Cutting-wise, it works just great, the same as the Big Shot but a bit wider at 6.5" instead of just 6".
You can cut with every kind of die - thick or thin. You can emboss too (in fact, an embossing mat is included, which I had to buy separately for the Big Shot). I was even able to cut with a long Sizzix border die and the long border cutting plate I had for the Big Shot. I had to shim it up a bit to get it thick enough to go through the Shapez cutter, but it worked just great too.
If you want to learn how to really use your die cutting machines, you need to take the A Cut Above class from Online Card Classes.
I know it says it's a card-making class but it's so much more than that. The class covers traditional die-cutting machines and Silhouette/Cameo die-cutting. There are so many moments of "Oh - so that's how you do that..." I can't even begin to tell you how much I learned from this class. It definitely gave me the confidence to get out my die-cutting machines - traditional and electronic - with every layout I've been creating.
Overall, I am so very happy with the Shapez die cutting machine. It does everything I did with my Big Shot machine but integrates with my Creatopia so that I have just a single machine to do everything. If you already have a Creatopia and you like to die cut, the Shapez machine is a great solution. If you don't have a Creatopia, you should get one. I'm just sayin'...
On a related note, I was able to sell my Big Shot and my Revolution in my garage sale - so I was able to pay for the Shapez as a break-even deal. Which was a big deal to me since I'm trying to keep to a budget for my scrapping habits. Yay me!
So one day I was browsing around the web and discovered that I could get a die cut machine that fits inside my Creatopia - the Creatopia Shapez. And I realized that all my prayers were answered. (Okay, I can get a little overly excited about little things.) And we had a garage sale coming up, so if I could sell my Revolution and my Big Shot, I'd have a single machine to do all my die cutting and adhesive-ing (a word I made up). That got me really excited.
I ordered the Shapez set from Create For Less (it's out of stock right now, but you can still get it from Xyron.com). I had to try it out as soon as it arrived.

The process of taking the adhesive cartridge and rolling wheel out of the Creatopia is easy once you get the hang of it. And the die press fits right inside the Creatopia - the platform then folds down to make a nice surface to roll the plates through. Cutting-wise, it works just great, the same as the Big Shot but a bit wider at 6.5" instead of just 6".
You can cut with every kind of die - thick or thin. You can emboss too (in fact, an embossing mat is included, which I had to buy separately for the Big Shot). I was even able to cut with a long Sizzix border die and the long border cutting plate I had for the Big Shot. I had to shim it up a bit to get it thick enough to go through the Shapez cutter, but it worked just great too.
If you want to learn how to really use your die cutting machines, you need to take the A Cut Above class from Online Card Classes.
I know it says it's a card-making class but it's so much more than that. The class covers traditional die-cutting machines and Silhouette/Cameo die-cutting. There are so many moments of "Oh - so that's how you do that..." I can't even begin to tell you how much I learned from this class. It definitely gave me the confidence to get out my die-cutting machines - traditional and electronic - with every layout I've been creating.
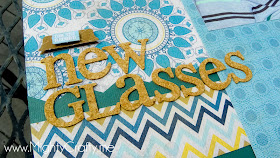 |
| Cork letters cut with the Quickutz 4x8 Chocolate alpha die |
On a related note, I was able to sell my Big Shot and my Revolution in my garage sale - so I was able to pay for the Shapez as a break-even deal. Which was a big deal to me since I'm trying to keep to a budget for my scrapping habits. Yay me!
Monday, June 18, 2012
Boys Rule June 2012 Sketch Layout
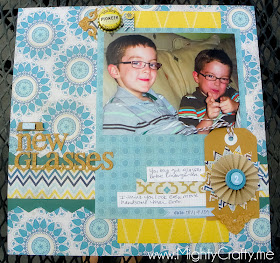
I completed another sketch challenge layout with the Boys Rule Scrapbook kit - this time for June 2012. This kit is full of blues, yellows, and kraft - one of my favorite color combos. Love the sketch and love the kit...

The layout is happy and fun - my 2 boys on the day they got their glasses. It feels like forever ago now - August 2009. Time truly goes by too fast.
The letters are cut with the self-adhesive cork paper included in the kit. I used the Chocolate 4x8 alpha die from QuickKutz.
The kit also included the fun rosette. This was the first time I've made one - and I admit, I had a few frustrating moments trying to get it to stick. I finally got it to work and I love how it looks.
I've said it before - but these kits are very well put together and fun to create with. I'm in love with this layout and I'm excited to add it our family scrapbooks. Thanks for looking!
Tuesday, June 12, 2012
Summer Mantel
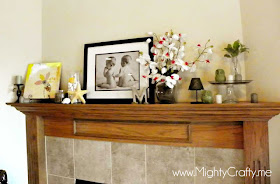
Summer is here and it's time for a summery mantel share.

I love beach accents on my mantel. We'll be heading to the beaches of California very soon, and I'm so looking forward to it.
Here's my summer mantel from last year:
Since last year, I've added the large mirror and moved things around a lot. This time last year, I was kind of barely unpacked in this new house - now, we are much more settled in to this home that we love.
And I love the mantel so very much...
Thanks for looking! Sharing at these great parties:

 : :
: :  : :
: : 

I love beach accents on my mantel. We'll be heading to the beaches of California very soon, and I'm so looking forward to it.
Here's my summer mantel from last year:
Since last year, I've added the large mirror and moved things around a lot. This time last year, I was kind of barely unpacked in this new house - now, we are much more settled in to this home that we love.
And I love the mantel so very much...
Thanks for looking! Sharing at these great parties:
 : :
: : 
Sunday, June 10, 2012
DIY Menu Board & Weekly Calendar
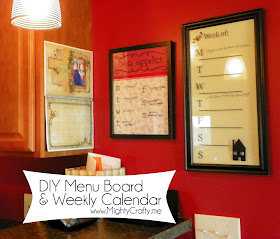
Another fun Silhouette project - I created this menu board and weekly calendar for our kitchen.
I had seen dry erase calendars at the store but I didn't like that they started the week on Sunday. For us, the weeks starts on Monday - so I created my own.
It was an easy project - just a frame with glass, then I designed and cut my shapes from vinyl with my Silhouette.
A quick and easy project to update our kitchen - thanks for looking!


Saturday, June 09, 2012
Quilted Camera Strap
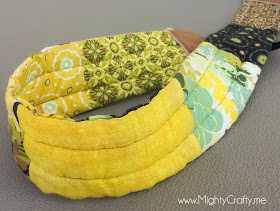
Today, I'm sharing a project I finished up a few months ago - a quilted camera strap.
A few years ago (I can't believe it's been that long already - yikes), I bought the most lovely little charm pack of fabric swatches from Stitch Steals.
The fabric was from the Basic Grey Origins line by Moda - yes, Basic Grey makes fabric too and it's beautiful. I bought the little pack of fabric swatches, not quite sure what I was going to do with it.
Fast-forward a few years, and these lovely custom camera straps were sweeping Pinterest - and I wanted one too. I found this pattern on Etsy from BirdfulStitches. And I finally knew how my charm pack would be put to use.
The only difference I made in the pattern was to quilt the fabric swatches together before creating the long piece for the strap. To make the stitching easier, lay out all of your squares right-side together before you start sewing...
Then, put them through your machine one after the other leaving just a one- or two-stitch gap in between each square that you can snip later. That way, you aren't starting and stopping over and over and over again. Makes it much easier.
The camera strap pattern is very easy to follow. I had an old makeup pouch that I cut up to use for the leather-ish end pieces. I love the light brown against the yellow and green.
So, that's my custom camera strap - I love it. It makes using my camera much more fun - and comfortable.
Sharing here:
Thursday, June 07, 2012
May 2012 Crafty Round-Up
I've been doing monthly round-ups for 2012, based on the class Kate Nelson taught at Big Picture Classes. I thought it would be fun to do a craft project round-up too, here on this blog. You can see the one I did for our family blog here.
For projects around the house, I made drop-cloth curtains to replace the vertical blinds in the dining room.
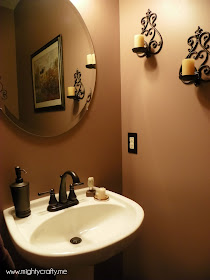
Byron put in a new bathroom faucet in the powder room. Love how it completes the room after the makeover it got earlier this year.
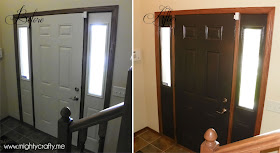
I painted the front door inside and out. What a difference. Love it even though this paint job made me cry at least 3 times (that's not an exaggeration - I'm terrible at painting).
I'm really proud of myself for staining the deck all by myself. When we moved in last year, I knew the deck was going to need to be tackled at some point. It had been neglected for a few years by the look of it, and was pretty sorry and grey. I kind of got a wild hair one day and thought I should just stain it before I chickened out. It was not easy, but I'm super happy it's done. It's now a nice dark brown.
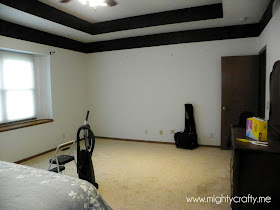
And best of all, We had the master bedroom, bathroom, and closet painted. Here's how the bedroom looked when we moved in:
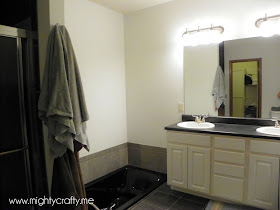
Crazy, right? What is up with those black stripes? It's so very-1995, even though this house was built in 2005. And those black stripes are textured with some kind of plaster, so I was kinda thinking it would be impossible to paint over them. And then, we had a very plain white bathroom (don't even get me started on the very weird tub-in-the-floor):
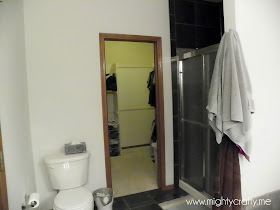
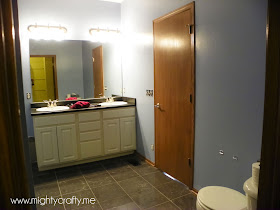
The thought of painting these rooms by myself was daunting to say the least - especially since, as I mentioned before, I have cried at much lesser paint jobs. Instead, we splurged and hired an awesome painter. He was able to paint all three spaces in 2 days. It looks AH-MAZ-ING.
Bye-bye black stripes...so much better. I am so happy every time I walk into our bedroom now. The bedroom color is Proper Gray from Sherwin-Williams. And the bathroom is Respite, also from Sherwin-Williams.
So nice and bright and lovely. Both rooms still need lots of sprucing up, but it's so wonderful to have the painting all finished. I keep hoping I'll run into Matt Muenster while I'm shopping at Lowe's some weekend and end up with a bathroom makeover. Sigh.
Mmmmm....Matt....
That's it for home decor - that's quite a lot for a month, even if 1 of those projects I hired out.
For scrapbooking in May, I created 7 scrapbook layouts this month - 5 paper...
That first layout was from a tutorial at Jessica Sprague's Photoshop Friday. Love those weekly lessons!
And finally, I started playing around with Lightroom print templates and created one to share with you all via download. I hope you enjoy it - and I'm hoping to make more soon.
That's it for May - a busy month. June is already underway, and I know I'll have more projects to share soon.
For projects around the house, I made drop-cloth curtains to replace the vertical blinds in the dining room.
Byron put in a new bathroom faucet in the powder room. Love how it completes the room after the makeover it got earlier this year.
I painted the front door inside and out. What a difference. Love it even though this paint job made me cry at least 3 times (that's not an exaggeration - I'm terrible at painting).
I'm really proud of myself for staining the deck all by myself. When we moved in last year, I knew the deck was going to need to be tackled at some point. It had been neglected for a few years by the look of it, and was pretty sorry and grey. I kind of got a wild hair one day and thought I should just stain it before I chickened out. It was not easy, but I'm super happy it's done. It's now a nice dark brown.
And best of all, We had the master bedroom, bathroom, and closet painted. Here's how the bedroom looked when we moved in:
Crazy, right? What is up with those black stripes? It's so very-1995, even though this house was built in 2005. And those black stripes are textured with some kind of plaster, so I was kinda thinking it would be impossible to paint over them. And then, we had a very plain white bathroom (don't even get me started on the very weird tub-in-the-floor):
The thought of painting these rooms by myself was daunting to say the least - especially since, as I mentioned before, I have cried at much lesser paint jobs. Instead, we splurged and hired an awesome painter. He was able to paint all three spaces in 2 days. It looks AH-MAZ-ING.
Bye-bye black stripes...so much better. I am so happy every time I walk into our bedroom now. The bedroom color is Proper Gray from Sherwin-Williams. And the bathroom is Respite, also from Sherwin-Williams.
So nice and bright and lovely. Both rooms still need lots of sprucing up, but it's so wonderful to have the painting all finished. I keep hoping I'll run into Matt Muenster while I'm shopping at Lowe's some weekend and end up with a bathroom makeover. Sigh.
Mmmmm....Matt....
That's it for home decor - that's quite a lot for a month, even if 1 of those projects I hired out.
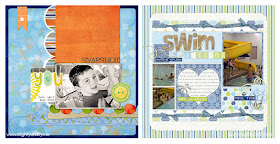
For scrapbooking in May, I created 7 scrapbook layouts this month - 5 paper...
...and 2 digital...
That first layout was from a tutorial at Jessica Sprague's Photoshop Friday. Love those weekly lessons!
And finally, I started playing around with Lightroom print templates and created one to share with you all via download. I hope you enjoy it - and I'm hoping to make more soon.
That's it for May - a busy month. June is already underway, and I know I'll have more projects to share soon.


